Wellness Appointments
From the Calendar (Staff-Booked)

Opening the Wellness Calendar
- Click Wellness Calendar in the left-hand navigation.
- Use the arrows to navigate to the desired date. You can adjust your view by clicking on the duration (1, 5, 15, 30) and time (Month, Day, 3 Days, Timeline).
Creating a Wellness Appointment
- Drag and drop the appointment type (e.g., vaccine, dental) into the correct time slot.
- Select Public or Volume client. For volume clients, you must search for their existing profile to schedule under.
- Enter the Client Information. HQ automatically searches for existing clients. Always select the existing profile if one is found.
- Enter Animal Information.
- Add a deposit (recommended).
- Confirm the appointment. You can adjust the start and end times if necessary on the last step.
Client Information:
- First and last name (HQ auto-capitalizes).
- At least one phone number (cell or home).
- Email address, or check No Email Available (note: many HQ features require email, such as consent, e-pay, confirmations, and reminders).
- Address (HQ will auto-populate; enter custom if necessary).
- Add Client Quick Notes (optional): Private notes for staff reference only (e.g., client owes money, banned). Displayed during future scheduling but not printed. Client tags are also useful for these types of notes.
Animal Information:
- Click Animal Information.
- Enter details or search for an existing patient (+Search Owned Animals).
- To add more pets, click +Add Another Animal.
- Optional fields:
- Caution (anxious or bite risk).
- Animal Notes (persist across appointments, e.g., allergic to penicillin).
- Appointment Notes (specific to this visit, e.g., up to date on vaccines except rabies).
Services, Products & Discounts:
- On the right, click +Add Services, Products & Discount.
- Select the desired items to add them to the appointment.
Viewing Patient History
For returning patients, after selecting the client and animal, click View Animal History (under Services & Products). This opens the complete medical history for quick review during scheduling.
Adding a Deposit
- On the Confirm Appointment screen, click + Add Deposit.
- Choose a tender type: Cash, Check, Credit Card (POS), Credit Card (E-Payment), or Credit Card (Manual).
- Enter the deposit amount.
- Click Save Deposit.
- Select Make Appointment.
✅ Pro Tip: Same-day appointments do not trigger email confirmations. This prevents walk-ins from receiving appointment confirmations after already arriving at the clinic.
Making a Basic Wellness Appointment
Basic Wellness appointments do not have assigned times or rooms. They only appear on the Spay/Neuter calendar.
- From the Spay/Neuter by Capacities Calendar, select the desired date.
- Click Make Basic Wellness Appointment.
- Enter owner and animal information as outlined above.
- Confirm and save the appointment.
Online Wellness (Client-Booked E-Appointments)

Like spay/neuter appointments, wellness appointments can also be scheduled online by public clients. The e-appointment form allows clients to select the type of appointment, choose an available time, and provide client and animal details in advance.
For details on how the online scheduler works generally, see the Online Appointment Scheduler section of this manual.
Enabling Wellness Appointment Types
- Verify that all wellness appointment type and room are created under Settings > Wellness Settings.
- Go to Settings > E-Appointments. Enable the appointment type for online scheduling.
- Test your form by clicking Preview in New Tab under your e-appointment link.
If appointments don't appear, ensure:
- The Appointment Type is enabled.
- The Spay/Neuter Calendar is open. If you aren't performing spay/neuter that day, set s/n capacities to zero by selecting Adjust Capacity for Today Only.
- Wellness Calendar room is open and allows for that appointment type.
- If you have Mobile Locations enabled, ensure a location is assigned on the S/N calendar.
What Clients See in the E-Form
- Choose appointment type.
- Select animal type and available date.
- Enter client and animal information.
- Select services (if enabled).
- Provide payment if required (deposit or online payment).
- Submit by clicking Request Appointment.
Clients then see a pop-up confirming their request is pending and receive an email notification.
Confirming an E-Appointment
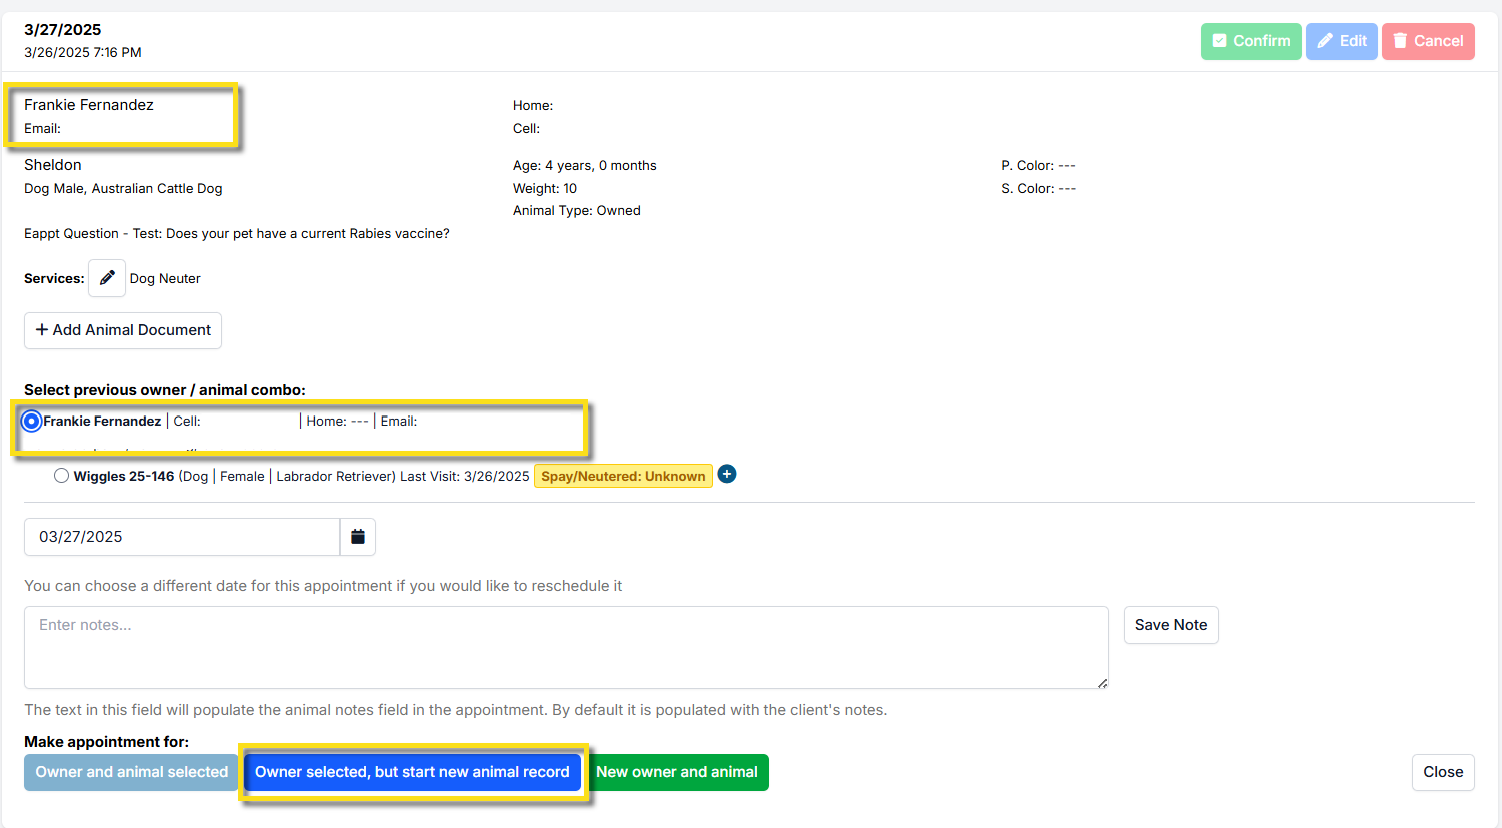
- From the calendar, click the green E-Apps button or go to Online Appointments in the navigation menu.
- Open the Wellness Appointments tab.
- Review the request to ensure the client is eligible for their appointment.
- If needed, make updates to the client's services by clicking the pencil icon next to Services before confirming the request.
- Click Confirmfor the appointment.
- If the client already exists in HQ, select their profile.
- If the animal is new, use Owner selected but start new animal record.
Once confirmed, the client automatically receives your clinic's confirmation email.
Timing Rules
- Online requests close at midnight in your time zone.
- Same-day requests are not available — only future dates appear online.
- To adjust how far out clients can book: go to Settings > E-Appointments > Edit > Number of months to book in the future.
Adding or Restricting Services
In Settings > E-Appointments, you can:
- Restrict available services by appointment type (e.g., only vaccines for vaccine clinics).
- Require clients to select at least one service.
- Add item descriptions to make options clearer.
Key Difference: Wellness vs. Spay/Neuter Online
- Spay/Neuter appointments: Can include other add-on services.
- Wellness appointments: Cannot include spay or neuter as add-ons. If requested, you must cancel and recreate as a spay/neuter appointment with additional services attached.