Public Spay/Neuter Appointments
Scheduling Public Client Spay/Neuter Appointments
Public clients are individual pet owners who book appointments or bring their animals directly into the clinic. This section will guide you through setting up Spay/Neuter (S/N) appointments for public clients in HQ, previewing both client details and animal details, which form the foundation of every S/N appointment.
Starting a Public Client Appointment (Internally)
You have two options when beginning a Spay/Neuter appointment in HQ:
Option 1: From the Calendar
- Navigate to Spay/Neuter by Capacities in the left-hand menu.
- Click on the desired date.
- Select Make Spay/Neuter Appointment.
Option 2: From Quick Search
- Press Ctrl + K on your keyboard, or use the Quick Search bar in the left-hand menu.
- In the Spay/Neuter box, click Make Appointment.
- You will be directed to the main calendar. Choose the desired date, then click Make Spay/Neuter Appointment.
Step 1 – Client Information
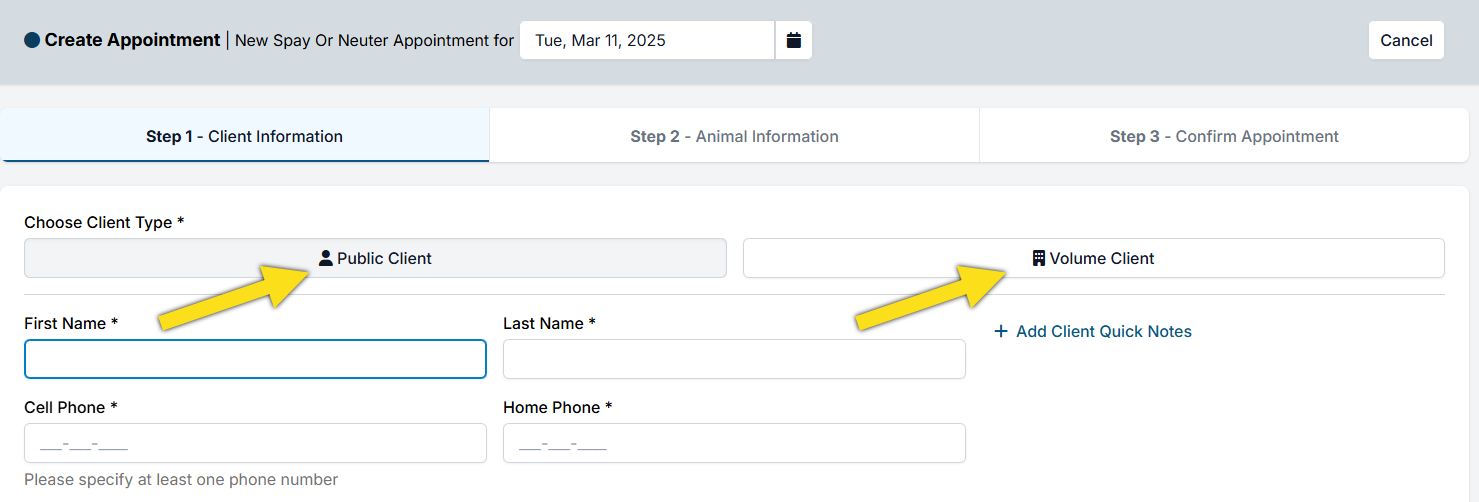
By default, Public Client is pre-selected on the Client Information page. Below is a breakdown of the key fields:
- First & Last Name (Required): Must always be completed.
- Cell Phone: Highly recommended. Enables two-way texting with clients.
- Home Phone: Optional but useful as a backup contact. Either cell or home phone is required.
- Email: Required unless you check No email available. Many features in HQ (e-pay, consents, reminders, receipts) rely on email.
- Client Address (Required): Uses an API lookup. If not found, use +Enter Custom Address to manually input.
- Additional Address Information: Apartment numbers or secondary address details.
Booking Returning Clients
- If the client already exists in your database, entering their name (or other info) will prompt a pop-up with their details.
- Select the correct client to pull in saved information.
- If it’s not the right person, click Cancel to create a new record.
Address Best Practices
- Physical address preferred: Required for rabies certificates and recommended for microchip registration.
- PO Boxes: Allowed if a physical address isn’t possible (e.g., on some reservations).
- Homeless clients: Use the last known long-term residence, following federal guidance.
Client Notes
- Add Client Quick Notes: Private notes displayed in future appointment pop-ups (e.g., client owes money or banned).
- Client Tags: Also helpful for tracking specific statuses or restrictions.
Step 2 – Animal Information
Once client details are entered, proceed to the Animal Information page. Collecting this thoroughly during scheduling saves significant time at checkout.
- Animal Name (Required): For returning clients, click Search Owned Animals to check for existing records.
- Species / Sex (Required): If unknown (e.g., feral cats), default to female for scheduling accuracy, then correct at checkout.
- Age: Enter the animal’s current age. Do not project the age for future appointments. Update during the exam if necessary. Avoid DOB entry unless essential.
- Color & Breed: Required for rabies certificates and microchip registration. Gather this early.
- Weight: Required if your clinic uses weight-based capacities. Estimate if necessary.
- Animal Type: Tracks ownership (e.g., owned, foster, shelter). Placement on the calendar depends on this selection.
- Animal Notes: Permanent notes (e.g., allergic to penicillin). Stays with the record.
- Appointment Notes: Appointment-specific details (e.g., might be pregnant). Do not carry forward to future visits.
Adding Multiple Animals
If the client is bringing more than one animal:
- Click +Add Another Animal.
- Scroll down to see the new record.
- Enter the additional animal’s details.
Special Flags & Animal Indicators
- Caution Flag: Marks anxious or aggressive animals with a red exclamation system-wide.
- Trap Indicator: For feral/owned cats arriving in traps. Displays as a Trap flag in Patient Flow.
Services, Products & Discounts
Use the +Add Services, Products & Discounts link to select procedures, add vaccines, or apply packages.
- Begin typing the service name (e.g., rabies) and select from the dropdown.
- Review pricing.
- Apply subsidies (discounts) by clicking the green Discount button.
Note: Some services are species-specific (e.g., Bordetella vaccine is dogs only). Only eligible items will appear in the dropdown.
Step 3 – Confirming the Appointment
Adding a Deposit
- If needed, click Add Deposit (green button).
Choose the payment type:
Cash – deposit made in cash.
Check – deposit made by check.
Credit Card (POS) – deposit via HQ’s credit card machine (Dejavoo). Requires HQ’s processor.
Credit Card (E-Payment) – manually enter card info on the screen. Requires HQ’s processor.
Credit Card (Manual) – for deposits processed outside HQ. No charges occur in HQ.
- Enter the deposit amount.
- Click Save Deposit.
- Once all information is complete, click Make Appointment.
Changing the Date
If a client needs to change the appointment date at the last minute:
- Click the date picker icon.
- Select the new date.
- The appointment will update without re-entering all details.
Important Note
Email confirmations are not sent for same-day appointments. This prevents walk-in clients from receiving confirmations after their animal has already been dropped off.
Rules for Spay/Neuter Appointments
You cannot create another S/N appointment for an animal if:
- They already have a pending S/N appointment.
- They were spayed/neutered at your clinic.
- They are marked as previously altered elsewhere.
You can book if the animal was previously declined for reasons other than already being sterilized.
S/N Online (E-Appointments)
Online Spay & Neuter Scheduler
The online spay & neuter scheduler allows public clients to create appointments for any kind of appointment that your clinic offers. This gives you a clear picture of what’s ahead and allows you to open the line of communication with your client before they step into your clinic.
Before proceeding with this section, check that your E-appointment settings have been configured under Settings > E-appointments.
▶ Video: For a quick video on e-appointments, click here
Previewing the Scheduler
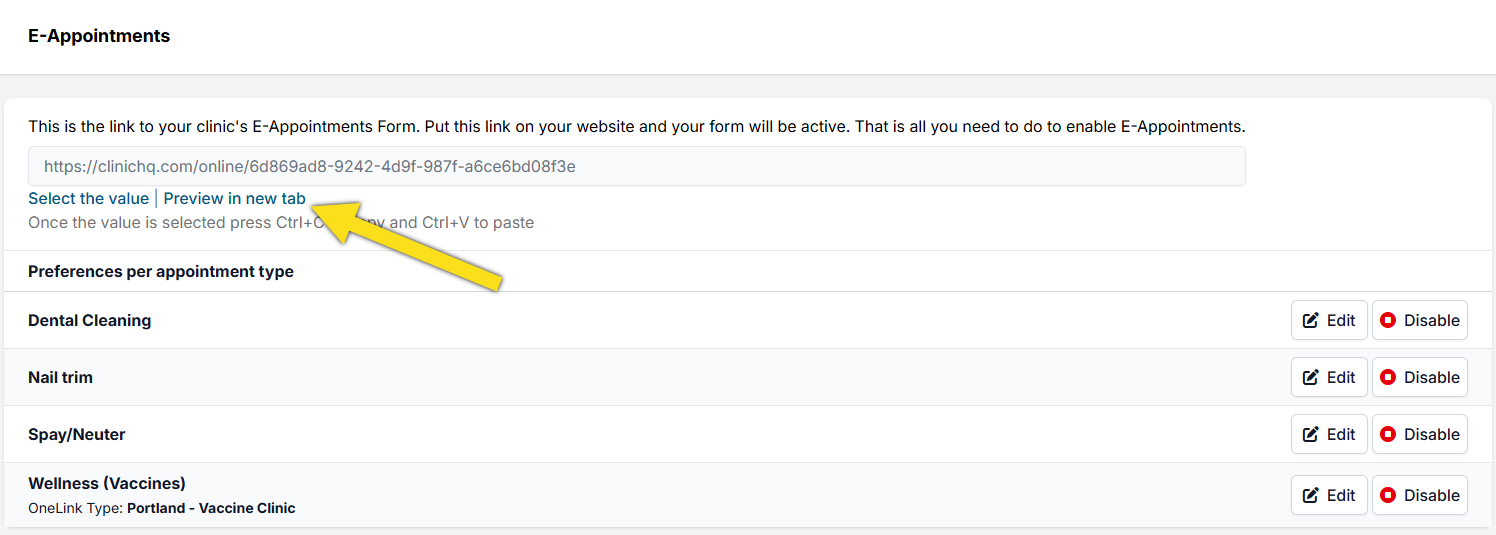
Each clinic is automatically assigned a link when setting up Clinic HQ. This is the link you will use on your website to direct clients to book appointments.
- Go to the Settings tab in HQ.
- Scroll down to the Scheduling section.
- Click on E-Appointments.
- By default, spay/neuter is the primary appointment type. If it’s not enabled, click the enable button to turn it on.
- To view your live form, click Preview in New Tab.
--- Unknown node: hardBreak ---
✅ Pro Tip: Learn how to add this link to your website here.
Using the Scheduler
- Choose Appointment Type - The client will start by choosing the appointment type they wish to book (e.g., spay/neuter, dental, vaccines). They will provide basic animal information such as species, size, and sex.
- View Available Appointments - Based on the client’s input, HQ will show open appointments that match their needs and your clinic’s availability. The form will only show appointments if your Daily Max has not been reached, and there is availability for the specific animal type they entered.
- Enter Contact Information - The client provides phone number, email, and physical address. If the address does not auto-populate, clients can select Enter Custom Address to input it manually.
- Enter Detailed Animal Information - Clients provide additional animal details. Custom questions can also be added.
- Confirm Appointment Details - Clients select services/packages in advance, view prices, and optionally pay a deposit. Clients must check a box confirming they have read and understood your deposit policy.
- Request Appointment and Pending Status - Clients click Request Appointment. They receive a pending notice, followed by an email confirmation once your clinic approves. If a client has multiple pets to book, the form will stay pre-filled with their details, as long as their browser is not refreshed.
Overbooking Protection
Our scheduling engine ensures clients cannot overbook your clinic. The moment an appointment is requested online, it is immediately removed from your calendar — even before confirmation. This prevents double-booking.
Timing of E-Appointments
- Appointments can be requested until midnight in your time zone for the following day.
- Same-day appointment requests cannot be made. The e-appointment form only shows future availability. Same-day scheduling must be done internally.
Priority Appointments
The Priority Appointments feature is an innovative, first-of-its-kind tool designed specifically to help high-volume clinics that face the challenge of limited appointment availability. Rather than simply filling slots on a first-come, first-served basis, this feature empowers clinics to use their appointments in a highly targeted way.
For example, some of our clinics use it in the following ways:
- Focus on key zip codes.
- Prioritize specific breeds.
- Ensure access for Spanish-speaking households.
- Reserve space for low-income families who may otherwise struggle to find care.
By strategically allocating appointments to the populations that need them most, clinics can maximize their impact and deliver care where it matters most.
▶ Video: Watch the quick video here ☕ Coffee Talk Video: See how Chicago Paws using Priority Scheduling to focus on key zip codes. Check out the video: Targeted Scheduling for the Biggest Impact with Clinic HQ and Paws Chicago
Why Priority Appointments Were Developed
Understanding why the feature was created will help you understand the structure and operation.
The need for Priority Appointments arose because many high-volume clinics face increased demand for services that exceed their appointment availability. This can create a stressful situation where staff are constantly forced to turn away clients or put them on long waiting lists.
To address this issue, the Priority Appointments feature was developed with the following goals:
- Ensure availability for priority clients and animals. Make sure there is always room in your schedule for those identified as high-priority.
- Provide sophisticated scheduling tools to meet goals. Enhance the scheduling module to better manage appointments while achieving clinic goals.
- Reduce staff burden. Avoid having to tell clients “no” when schedules are full and reduce the stress of handling overbooked calendars.
- Target specific populations. Focus on geographic or demographic groups that your clinic serves, offering better care to the communities that need it most.
Note: This tool does not hold back appointments for days that are already available for booking on your schedule. It provides greater access to future appointments, so make sure you adjust your settings accordingly.